Welcome to
PumpkinSpice's "National Scrapbooking Day" Celebration!!
This
is PumpkinSpice's Final post for today. Please be sure to play along
with all the challenges we put together for the day. To see previous posts, simply scroll down
the page.
Thank you so much for
participating in National Scrapbooking Day with us here at Pumpkin Spice. We
are very excited about the fun challenges we put together for you and all the wonderful project filled with tons of inspiration the amazing ShopPumpkinSpice Design Team shared throughout the day. Let's give them a great big APPLAUSE for all their work.
In this final post we are announcing the winner of April's Blog Hop Challenge and Debuting the ShopPumpkinSpice May Card Kit!
*************************************************
WINNER of the SPS MAY CARD KIT
Lisa!
This is her project!
I just love this cupcake!! Doesn't it make you smile?
ShopPumpkinSpice website is having techincal issues this weekend. uugghh.. To order anything while the site is down, simple email me at Sales@shoppumpkinspice and I will get right back to you with an order total.
Thank you for your patience while we try and figure out this glitch.
Welcome to
PumpkinSpice's "National Scrapbooking Day" Celebration!!
This is PumpkinSpice's 3rd post for today. Please be sure to play along with all the challenges for the day. To see previous posts, scroll down the page. We have one Final post at 6 pm.
Thank you so much for
participating in National Scrapbooking Day with us here at Pumpkin Spice. We
are very excited about the fun we have planned and all the inspiration we have
to share.
In this final post you will see some
amazing Projects made by the ShopPumpkinSpice Design team. I am sure
you will find oddles of inspirations in thier lovely works of art.
***Warning - Very long, picture heavy post!***
*****************************************
First up is Diana, Shop Pumpkin Spice's Featured Designer for May. She has made an amazing project to showcase the papers in this months kit. "Spicy Chic".
For more details on Diana's "Happy Cinco de Mayo Birthday" card, visit her blog at DL.ART
*****************************************
This Post has 7 Tutorials, WOWZA! Have Fun! If you need to find these tutorials and others at a later date, you can find them in the Tutorial Pages, on the Pumpkin Spice Blog and Shop Pumpkin Spice Website, for future reference.
3.Circles Nestabilities 2 sizes (I used the small collection of classic circles the largest and the 2nd largest circles)
4.Printer paper
5. Adhesive
1. Look online to find inspirational quotes. Copy and paste them into a word program. Make sure they are spaced out well then print onto light weight printer paper. (You can get creative here with colors etc, but make sure it isn't heavy paper because it will be too thick to fold later.)
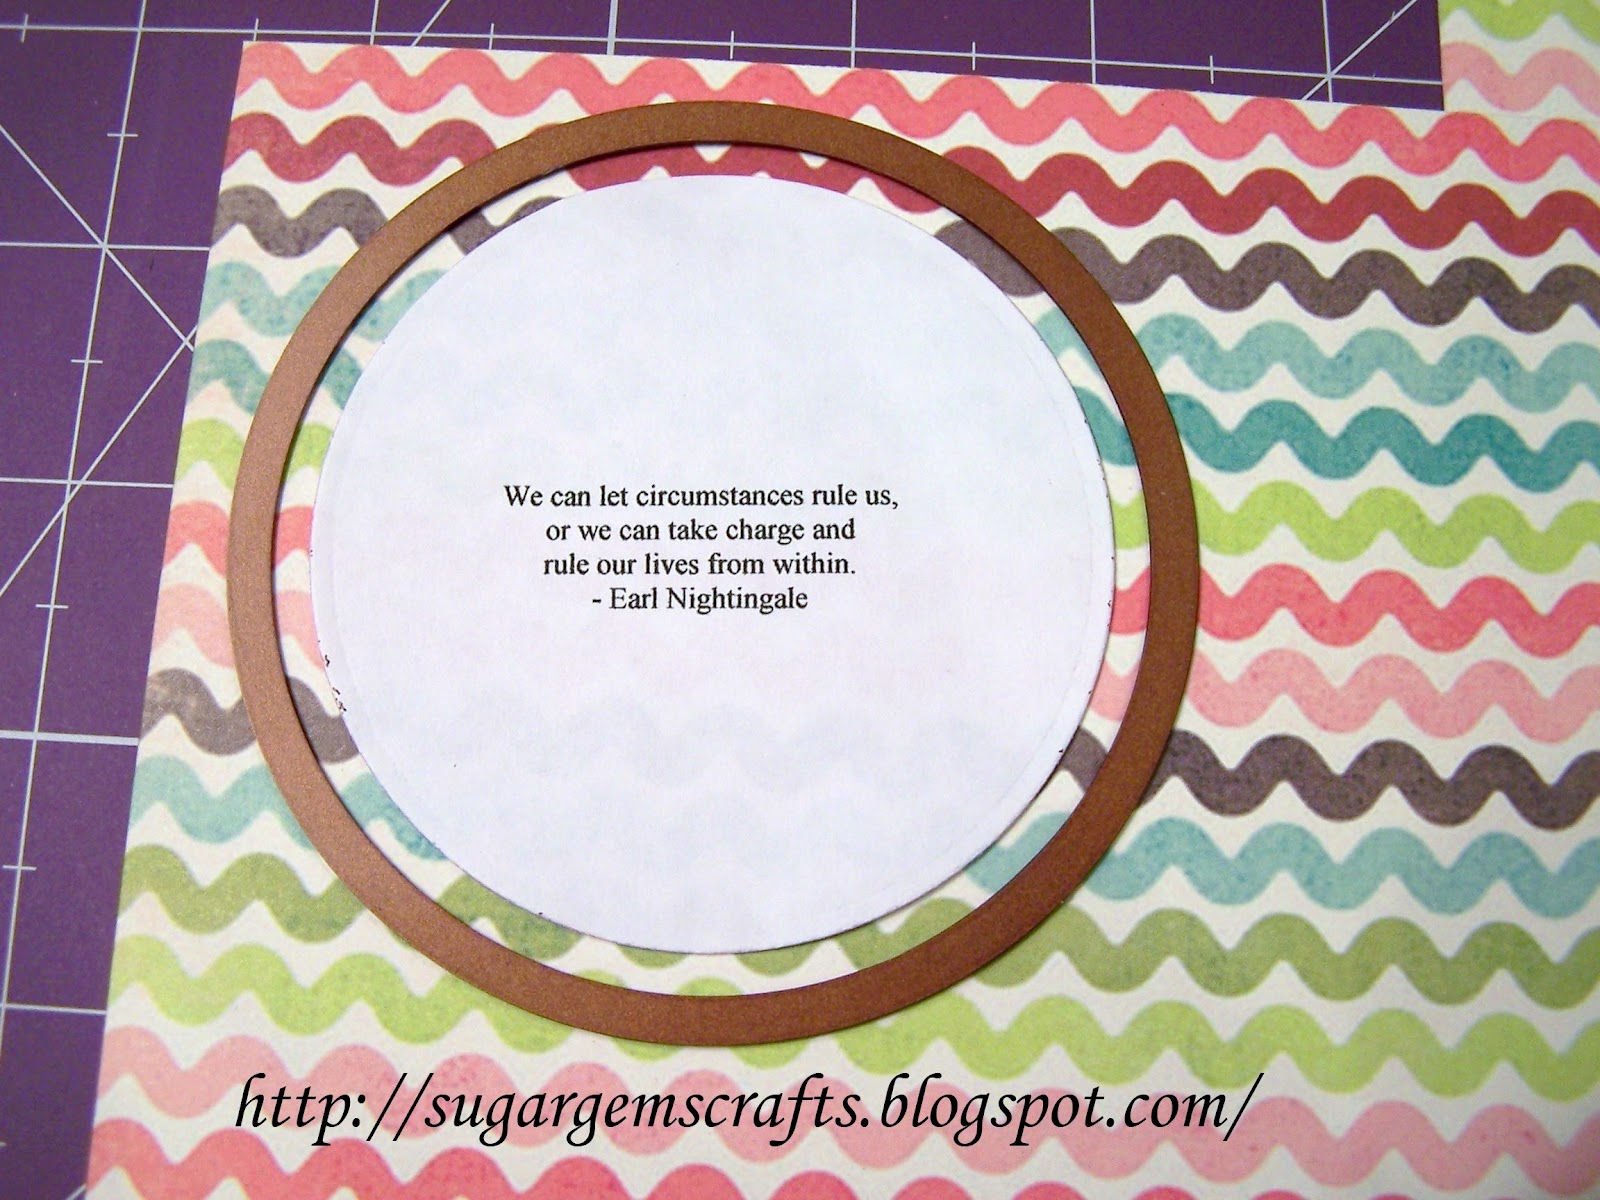
2. Cut out quotes with smaller circle nestability.
Here is what you will end up with.
3. Cut out your patterned Lime Twist paper using the larger circle nestability. The Picture shows how the nestability is larger than the white printer paper.
Here is what you will end up with.
4. Adhere your quotes to the inside of your Lime Twist circles. Make sure to get the adhesive close to the edge of your printer paper because you will be folding and squishing and you want it to look nice.
5. Place a strip of twine in the middle of your circle. The length will depend on the size of circle you use, but you want the twine to be long enough to tie a bow after folding.
6. Fold your circle in half like a taco.
7. This is the hardest part. Bend your taco backwards. The thicker the paper the harder this is to do without tearing your paper so be patient and go slow. And don't cut yourself with the paper.
8. Squeeze together.
9. Tie a bow. DO NOT tie a knot you want your recipient to be able to just pull the twine bow and let it unfold without cutting. (You might need a helping hand here to tie the bow because the paper is going to want to unfold while you tie the bow. You can also place it between your knees, if you are sitting, to hold the cookie together and then tie your bow if you don't have anyone to help.)
That's it Easy Peesy! Pretty cute little surprise for friend!
For more details on Lenae's "Fortune Cookie" Project, visit her blog at SugarGem
1. Score a 12" x 12" piece of patterned cardstock at 5" and 7" then turn the paper and score at 3" and 9" in the other direction.
2. Cut the "shorter" score lines until they meet the other score lines (see picture 2).
3. Fold the two flaps you have just created in toward each other and glue down.
4. Cut 1 3/4" off each side of the top panels ONLY.
5. Score the bottom two panels at 1" and 11".
6. Cut a piece of paper to 8 1/2" x 4 1/4" and score it at 1 1/4" inches on both short sides and one long side. Then cut the corner squares out.
7. Fold along the score lines and apply glue.
8. Attach to your 12"x12" on the top panel with the shorter sides, this creates a pocket for your cards.
9. If you would like you can use scissors to angle the sides of you card pocket.
10. Cut a piece of paper to 5 1/2" x 2 1/2" and another piece to 4 1/2" x 2 1/2". On the short sides score at 1/2" and 1" and on one long side score at 1/2". Cut out the bottom corners.
11. Fold and apply glue.
12. Attach these mini pockets to the front of your larger pocket.
13. Now we're going to make a mini address book. Start but cutting lined paper into 3 1/2" x 6" inches. Then cut a piece of patterned paper to 3 3/4" x 6 1/2". Stack all of these together, fold in half, punch holes, and bind using brads or twine (or both!).
14. Glue the mini book to the bottom flap of your stationary box.
15. Now we will make a little pocket for stamps. Cut a piece of patterned paper to 2" x 3". Score both short sides and one long side at 1/2". Cut out the bottom corners. Fold and apply glue.
16. Attach the packet next to the address book.
17. Cut a strip of paper and wrap it around the pen you would like to use then secure it and glue it below the address book and stamp pocket.
18. Now we will make the lid. Cut a piece of paper to 10 1/8" x 6 1/8". Score all the way around at 2"
19. Cut the vertical score line up to the horizontal score line and trim the corners.
20. Apply glue and use the flaps you created to secure the sides together.
21. Add embellishments.
22. You're done!
For more details on Alyssa's "Send a Letter" Project, visit her blog at My Thoughts Exactly
You will need an 8x10 inch frame and your favorite designer paper. I am using Echo Park's Country Drive. By using paper from one paper line it makes coordinating my patterns easy.
Step 1: Cut paper to 8x10 inches and adhere to 8x10 chipboard or frame backing. I chose to use chipboard. Step 2: Cut coordinating cardstock to 10x9 1/2 inches. You will lay thins on your scoreboard with the 9 1/2 inches across the top. Score at 2 1/2, 4, 6 1/2, and 8 inches.
Step 3: Fold cardstock mountain and valley.
Step 4: Add sticky strip to create pockets.
Step 5: Add border strips to top of pockets and create a lattice with some Twinery Twine. I used The Twinery Baker's Twine in Peapod After you have completed this step you can adhere you pockets to your background.
Step 6: Cut coordinating strips of cardstock to dress up your frame. There is no size here because this all depends on the type of frame you are using. I used Mod Podge to adhere my strips.
This is what my frame looked like with the strips glued down. I did miter the corners using a craft knife.
Now it is time to put your backing in the frame. You may need to add your glass behind your backing. Because I used chipboard, I did not need to do this. Here you can see tha I added some trim. This is theSunday Picnic Trim from Webster's Pages. It is gorgeous trim!
The last thing I did was embellish my frame.
I used some stickers that came in the Echo Park Country Drive paper pack. The flowers were cut out using my Cricut Expression and Plantin Schoolbook Cricut cartridge. The buttons were from my stash. I also embellished a paper clip to add. There is plenty of room for more pictures and tags.
Here's one last look at the frame.
For more details on Saundra's "Altered Frame" Project, visit her blog at Luv Scrapping
****************************************
Are these project
inspiring or what!?! I am so amazed at what the Lovely Ladies put together. Paper project really only limited by our own imagination aren't they. I just love each and everyone of these projects... and will definitely be using these wonderful tutorials.
Are you ready for a Challenge and a chance to win a gift card??
Yeah... ok, first I wanted to go over a couple of rules and guidelines for the
challenges.
*You may only enter
once for each challenge. Please use the inlinks button on the bottom of each
post to add your picture using a direct link from your blog. If you don't have
a blog, you can upload a picture of your project to PhotoBucket or something
similar to directly link below.
*Project must be new
for the Challenge. Not something that has been shared elsewhere.
*There must be a link
to the Pumpkin Spice Challenge you are entering in your blog post.
Now for the
Challenge: Ready??
Make a Project
- anything goes!
with the following
elements:
- the color Green,
- something Square,
- at least 1 die cut.
- link your
post/picture below
- leave a comment on
each of the Design Team members project posts above.
and HAVE FUN with it!
One lucky participant
will be randomly selected on Monday, May 7th. You will be contacted directly,
so please be sure your post or blog has contact information.
This Lucky
Participant will receive a $20 gift certificate to ShopPumpkinSpice and a Guest
Designer spot to showcase another project during the month of May.
Thank you everyone
for stopping by today. Remember to scroll down to visit all of the posts on PumpkinSpice today and enter some fun challenges! Check back at 6 pm PST for the winner announcement from the April Blog hop!


